Search This Blog

10 Weeks of Christmas -- Week Three...Christmas Cookies!

>> Monday, October 31, 2011

One of my favorite things about Christmas is the food.  Specifically all the sweets.  Many of you know, I am a Type 1 Diabetic, but I haven't always been.  I wasn't diagnosed until I was 20, so I had 20 perfectly glorious years where I didn't have to count carbs or worry about my blood sugar levels.  And because I had a "teenager's metabolism" I didn't even have to worry about calories or fat.  Oh, to be young again!

Anyway, I really do LOVE me some Christmas cookies!   We have a lot of traditional cookies that are made every year, so I thought I would share some of them with you.  To me, they mean Christmas is here, family, traditions.  You know, everything about Christmas.  Enjoy!


Candy Cane Cookies - my Grandma Jean


1/2 cup shortening
1/2 cup margarine
1 cup sifted powdered sugar
1 egg
1 tsp vanilla
1 1/2 tsp Almond extract
2 1/2 cup flour
1tsp salt
1/2 tsp. red food coloring
1/2 cup crushed peppermint candy canes
1/2 cup granulated sugar

Directions:
Heat oven to 375'.  Mix shortening and butter, powdered sugar, egg and flavorings well.  Add salt and then gradually add flour.  Remove from mixing bowl and divide in half.  Blend red food coloring into one of the halves, leaving the other 1/2 without coloring.  Roll 4" strip of cough (1/2 to 1 tsp of dough) from each color.  Using lightly floured board, place strips side by side.  Press together at top and twist like a rope.  For best results, complete 1 cookie at a time as they tend to dry out.  Place on ungreased cookie sheet.  Curve top for handle (like a real candy cane).  Bake 9 minutes.  While still warm, remove from pan and sprinkle with mixture of candy and sugar.


Chocolate Crinkles - My Grandma Jean


1/2 cup vegetable oil
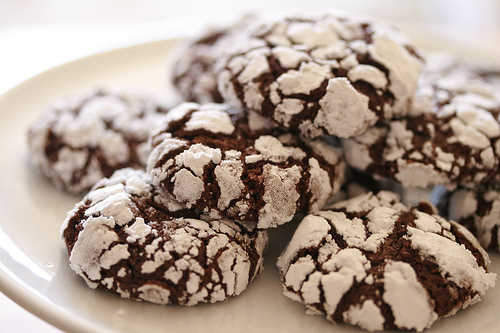
4 squares unsweetened chocolate (melted, 4 ounces)
2 cups granulated sugar
4 eggs
2 tsp. Baking Powder
2 tsp. vanilla
1/2 tsp. salt
2 cups flour
1 cup Powdered sugar

Directions:
Mix oil, chocolate and granulated sugar.  Blend in 1 egg at a time.  Mix well.  Add vanilla.  Sift flour, baking powder and salt into oil mixture.  Mix all together.  Chill several hours or overnight.  Heat oven to 350'.  Drop a teaspoon of dough into powdered sugar.  Rolling sugar, shaping into ball.  Place 2" apart on greased cookie sheet.  Bake 10-12 minutes.  Do not overbake.  Makes about 6 dozen.


Butter Pecan Turtle Cookies


Crust:
2 cups flour
1 cup butter or margarine
1 cup brown sugar
1 cup pecan halves

Caramel Layer:
2/3 cup butter or margarine
1/2 cup brown sugar

Top:
1 lb milk chocolate

Directions:
Preheat oven to 350'.  Combine crust ingredients, reserving pecans.  Mix 2-3 minutes.  Pat firmly in ungreased 9x13 pan.  Sprinkle pecans evenly over unbaked crust.  Prepare caramel layer.  Pour evenly over pecans and crust.  Bake for 18-22 minutes or until caramel layer is bubbly and crust is light golden brown.  Remove from oven and sprinkle with chocolate chips.  Allow chips to melt slightly then swirl as they melt.  Cool.  Cut into bars.

Caramel layer: in heavy sauce pan, combine brown sugar and butter.  Cook over medium heat stirring constantly until mixture begins to boil.  Boil 30 seconds to 1 minute, stirring constantly.  


Peanut Blossoms (aka peanut butter kiss cookies)


3.5 cups sifted flour
2 tsp baking soda
1 tsp salt
1 cup shortening
1 cup peanut butter
2 cups granulated sugar
1 cup firmly packed brown sugar
2 eggs
4 Tbs milk
2 Tbs vanilla
Hershey's chocolate kisses

Directions:
Preheat oven to 375'.  Grease baking sheets.  Sift flour, soda and salt onto a piece of waxed paper.  In a mixing bowl, cream shortening, peanut butter, 1 cup of the granulated sugar and brown sugar until light and fluffy.  Stir in eggs, milk and vanilla and beat until blended.  Stir in flour mixture and mix well.  Shape into balls and roll in remaining sugar.  Place about 2" apart on baking sheets.  Bake in preheated oven 9 minutes.  Top each cookie with a chocolate kiss and bake 2 minutes longer.  Remove from baking sheets and coll on wire racks.  Makes about 6 dozen cookies.


Pecan Shortbread Cookies


2 sticks unsalted butter, room temperature
2/3 cups powdered sugar
1/2 tsp vanilla
2 cups flour
1/2 cup pecan bits
1 lb. powdered sugar

Directions:
In mixer, beat butter and powdered sugar on medium speed for around 3 minutes.  The mixture should be very smooth.  Beat in the vanilla then reduce the mixer to low and add flour, mixing only until it is incorporated.  Do not overmix.  Add pecans.  Using a spatula, transfer the soft, sticky dough to a gallon sized plastic bag.  Put the bag on a flat surface and spread the dough evenly in the bag.  The end result will be a square of dough about 1/4" thick.  Seal the bag and refrigerate for at least 2 hours, or up to 2 days.
When ready to bake, preheat oven to 325'.  Line 2 baking sheets with parchment paper or silicone mats.  Remove dough from fridge and cut away the bag.  Using a sharp knife, cut the dough into bars, about 1.5"x.5".  Transfer the bars to baking sheets and carefully prick each one twice with a fork.  Bake for 18-20 minutes, rotating sheets half way through.  They are done when they turn a pale color...watch so the bottoms don't get too dark.  When you remove them from the baking sheets, roll in powdered sugar while still hot.  Place on cooling rack to cool and serve at room temperature.


Buckeyes


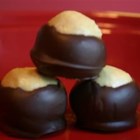
1.5 cups peanut butter
1 cup butter, softened
1/2 tsp vanilla
6 cups powdered sugar
4 cups semisweet chocolate chips

Directions
In a large mixing bowl, combine peanut butter, butter, vanilla and powdered sugar.  The dough will look dry.  Roll into 1" balls and place on cookie sheet lined with wax paper.  Chill in the freezer until firm, around 30 minutes.  Melt chocolate chips in a double boiler or a bowl set over a pan of barely simmering water.  Stir frequently until smooth.  Remove peanut butter balls from freezer.  Using a toothpick, dip frozen balls into melted chocolate, leaving a small portion showing at the top to make them look like buckeyes.  Put the buckeyes back on the cookie sheet and refrigerate until hardened.  After hardened, remove from cookie sheet and place in a cookie tin that can be stored in the fridge as these melt easily and should be served chilled.


Read more...

10 Weeks of Christmas -- Week Two...Neighbor Gifts - the Non-Food edition :)

>> Sunday, October 30, 2011

Lesley and I both posted some great food ideas for neighbor (or friend gifts) here and here earlier this week. But most of the ideas were food gifts. If you are looking for some ideas that don't involve food, here are some ideas for you.  I tend to gravitate more towards the "winter" ideas because if you give the gift sometime the week before Christmas, they will be able to keep it out longer if it is snowmen or winter rather than Christmas.

Idea #1 - Snowman Doorstop - These are adorable! My mom made these one Christmas about 5 years ago and I still love putting it out each year! I put mine in our front porch each year. She used some clay (that you bake to harden) in orange for the carrot nose and in black for the eyes and buttons. I really like the idea of using real buttons, though. 


Idea #2 - A Snowman Kit - Another cute idea. The carrot is purchased, but the hat and the scarf are homemade, so it makes it budget friendly!


Idea #3 - Sock Snowmen - How cute are these snowmen?! And they are made from a tube sock and a decorative sock found at Target for $1! These are cute and easy!


Idea #4 - Hand Soap - Something everyone uses, and it's fun to have some festive soap for the season! I like the cute saying she came up with for it, and she includes the file to download so all you have to do is print, cut it out and attach it to the soap!


Idea #5 - Christmas Printable - I just love all the printable files floating around on the internet and I think it would make a great gift! I recommend sending the file online to a photo printing place (like Walgreens, CVS or similar) so you have a good quality 8x10 print. Find some inexpensive frames to put them in. A little more on the pricey side if you have a lot of gifts to give, but it's really easy and doesn't require any "Martha Stewart-type skills" :) There are tons of free options online (search for subway art), but here are two that I really liked. 

source

The best part about making a non-edible gift is that you can do it now and not have to scramble at the last minute trying to get everything done in the craziness of the holiday rush.  Hope these ideas help give you some inspiration for the holidays!

Read more...

More Neighbor Gifts

>> Thursday, October 27, 2011

When Beth and I first decided to do a Christmas countdown, I thought it was a great idea and was so excited that I'd be able to get my gifts ready early.  But, like Beth, I lean towards food gifts for neighbors.  So I can't get those ready in October.  The recipients that would fall into the "neighbor" category for me would be bus drivers, teacher assistants, school secretaries and principals, some friends, some extended family members, and of course actual neighbors.  I am posting some ideas I've found online.  Please visit the link below to see details on how to make the gifts, recipes, and some really great blogs/websites!


Hot Chocolate Mix from myrecipes.com


Fudge in an Ornament   This link takes you to Tip Junkie, and a post with several really cute ideas. 


Pretzels:  This idea comes from howdoesshe.com and again, if you follow the link you will find a bunch of great ideas.  Beth already featured one of them.  I like to make pretzel rods dipped in melted caramel and then rolled in mini chocolate chips, toffee pieces, and butterscotch chips.  They can then be drizzled in red colored white chocolate or coated with sprinkles for a more festive look.  You can usually find little pails like this at Target in the dollar section.


Pretzel Treats: Totally adorable and pretty inexpensive.  The link gives a detailed how-to.


Reindeer Food  Adorable


Peppermints  I love this packaging. 


cookie bags  A really cute way to package cookies


White Chocolate Dipped Peppermint Sticks.  This may be my favorite because it is so simple yet so beautiful.  Love the packaging here as well.  I couldn't find the original source, but I think it's from Country Living.

For more ideas, simply go to pinterest.com and type "Neighbor Gifts".


Read more...

10 Weeks of Christmas -- Week Two...Neighbor Gifts

>> Monday, October 24, 2011

Yeah, so there are only 9 more weeks until Christmas....EEK!  This week, we are focusing our countdown on Neighbor Gifts.  While I haven't been a good enough neighbor in the past to actually give my neighbors a gift :), this is the year that changes!  In all seriousness, in the past I've made things to give to members of our church, friends, extended family, etc.  I would include all of these people in the "neighbor" category.  It's someone that you want to get something for, but don't want to spend a lot of money because you have lots of these people on your list!

In the past, I've made homemade lotion, homemade candles, homemade jam, truffles, chocolate bark, cookies, etc.  We've been given fruit, homemade hot chocolate mix, chocolate spoons, cookies, etc.  Of course, these were given/made before my "blogging days" and I never took photos of these things, so I can't share them here!

What makes a good neighbor gift?  In my opinion, it's something edible or something that can be used up.  I don't like clutter (though I have plenty of it!), so if it's something I can enjoy but not feel like I have to hang onto it for a long time, that's my personal favorite!

I love to make things, but I'm not very creative.  I have to see something in order to figure out how to put something together.  That's why they make the internet and pinterest!  Here are some of my favorite ideas for neighbor gifts this year:

Cinnamon Applesauce Ornaments.  I made these when I was little.  Easy, cheap and fun to make.  Oh, and they make your house smell yummy!

source

Apple Cider Caramels - these look so yummy and would definitely take a little more time to make and package individually.  But they are cute and more original than cookies!
source

Stamping onto metal is something that I've been wanting to try lately.  Ever since I ordered a custom mommy necklace.  It seems like it would be so easy.  The person that made this one gives a link to how to stamp the ornament and I think this would even be good as a gift tag/bow.  Depending on the number of people on your "neighbor" list, you could customize them a little more or just leave them generic with "Christmas 2011".
source

My husband's aunt makes Cinnamon Pecans for everyone each year at Thanksgiving.  We don't get together with the extended side of the family for Christmas, so it's our Christmas gift that we receive at Thanksgiving.  It is so yummy and it's one thing I look forward to every year.  This blogger gives instructions on how to make them, and as she points out, you can use any type of nuts.  Pecans and Almonds are probably the most common nuts to use for this, though.
source

Chocolate dipped pretzels are another great idea.  I love the sweet and salty combination!  They are pretty easy to make as well, just dip pretzels into the chocolate, let them harden and package them however you like!  I found these and thought they are simple but they are beautiful!  I love how the white nonpareils make it look like snow!
source

This idea is so cute!  It's Santa party mix!  The Santa hats are made from Bugles, chocolate, white nonpareils and mini marshmallows!  Mixed with chocolate covered pretzels, M&M's and chex cereal.  What a great idea and so festive!
source

So, I'm not really much of a mint and chocolate person, but these homemade peppermint patties look good.  They also look homemade, which if you are going to take the time to make a gift for someone, I would rather it look like I took the time to make it rather than looking like I picked it up from the store :)  Anyway, she mentions having a hard time finding peppermint oil, but I found some easily on amazon.com here.
source

So, what if you're not Martha Stewart?  I also found some cute ideas with no baking or cooking skills required!  After all, it's the thought that counts and not your skills in the kitchen!

The first idea is a box of brownie mix (because who doesn't use brownie mix?!) and a wooden spoon.  The she printed out a gift tag that reads: ‘Christmas is Jolly, Christmas is sweet.  I’m stressed out so make your own darn treat!

source

Peppermint Crunch cookies: I don't want to have a post full of cookie ideas, but these are simple because you buy the cookie and just add white chocolate and peppermint chips to it!  Yummy and easy!
source

The second idea is etsy.com!  It's a marketplace of homemade goodies....all online, and everyone ships directly to you!  If you just don't have the time to make something but want something homemade, check out etsy!  I found some cute homemade cookies and gift tags.
  
source
source 


This idea is really easy as well.  Find a cute box, print a message on paper and cut it to fit the bottom of your box.  Fill the box with M&M's (or you could use festive kisses!).  When your recipient eats the candy, it will reveal the message.  Easy but cute!
source

So, if you really know your neighbors or if you just want a funny gift, this next idea is for you!  Purchase a box of "Ho Ho's" and "Ding Dongs" (both Hostess pre-packaged sweet treats), tie them together with a cute ribbon and put a gift tag that says, "Ho ho ho! Merry Christmas from the Ding Dongs next door!"
source


This next idea is more of a packaging idea, but she made cookies and packaged them in tin cans.  I think that's a great idea so the cookies don't get crushed.  Some other ideas of how to package your goodies are festive tins, Chinese take-out boxes, clear plastic bags, festive plates wrapped with plastic wrap or zip-loc bags.  Hobby Lobby tends to have a great selection of items to use and they typically even have some hard plastic chargers (decorative plates) for around $1!  Make sure to check in the Cake Decorating aisle for additional "non-seasonal" items that you can make seasonal using ribbon or scrapbook paper.  
source


Well, there's my list of neighbor gift ideas!  I know there are still 9 weeks until Christmas and you have plenty of time to do this, but it never hurts to have your ideas in line early to try and beat some of the last-minute Christmas rush!

Read more...

Vacation, Louisville style day 4

>> Friday, October 21, 2011

Day #4 was also our last day of vacation in Louisville.  Steve's convention was over Friday night at the awards dinner, so we had him the entire day.  We took our time getting up and packing the room.  Steve made a trip down to the van while we watched from the window.  Our van is the blue "blob" in the middle of the photo...and Steve could see is looking and waved to the boys.  Oh, and a cool thing to note...the remote to the power doors works from 10 floors up.  I was able to click the button and open the door of the van from up in the room!


My boys in one of their favorite parts of the hotel...the elevator.  They fight every time we get in one as to who gets to push the button!  And my favorite part?  They only pushed the "call help" button once!


On the race horse in front of the hotel.  Kinda like Cincinnati has flying pigs all throughout the city, Louisville has horses!


What was on the agenda for day #4?  What else, but the Louisville Slugger Museum & Factory!  Steve and I had been there before while visiting family in Louisville probably 8 years ago so we knew the boys would love it!  Here's the famous Slugger bat, which is the world's biggest baseball bat!  It just so happened that the museum was celebrating adding a Derek Jeter sculpture to the museum and in celebration of his #2 jersey, admission was $2 each!  So, instead of $20 for our family it only cost us $4 (under 5 is free)!


Some of the displays outside of the museum along the sidewalk:


Yep, these boys were in HEAVEN!


Here is a video of one of the exhibits in the museum.  The boys loved this one!


You aren't allowed to take photos on the tour of the factory, but they take you through and show you the process of taking the "billet" or raw wooden cylinder (like these) to a bat.  They have a lathe that they show how they used to do it by hand, but now they have machines that do it all by program.  It's pretty cool that they can control the weight and shape all by a computer program.  They have machines that do the "common" bat types and then one machine that customizes the bats for the professionals.  They said the normal pro goes through around 150 bats in a season!

At the end of the tour, we were given Mini baseball bats.  The boys were thrilled!  Now the trick is going to be to keep them from beating each other (and my house!!) with them!  Here's a photo of them with one of the sculptures (Babe Ruth, I think) and their mini bats.


After the tour, we visited the kids area and the boys were able to hit in a "batting cage" setup with balls and a tee!  Tyler loved this and he was really good at hitting it!  Ryan, not so much but he had fun!


Steve took his turn in the adult batting cages.


After the tour, we found a local Mexican restaurant that I had heard good things about....Los Aztecas!  It was yummy...Steve had his normal steak fajitas, but I had a really good Shrimp salad :)


You know it's been a good day of vacation and that the kids had fun when this is the sight on the ride back home:


Once we got back to Cincinnati, we took the Anderson Ferry back across the river to my in-laws house to pick up the dog.  The boys loved it just as much the second time as the first time!  Especially since the trip the second time was with about 10 motorcycles.  Steve even got out of the van with them and went to the edge too look over.

So, vacation was exhausting for me.  But the boys had fun and lots of memories were made!  Vacation, Louisville style is now in the books!

Read more...